Google Analytics 4 (GA4) is the current iteration of Google's web analytics platform, designed to provide a comprehensive and insightful understanding of user behavior across websites and apps. Building on the foundation of Universal Analytics, GA4 introduces a range of advanced features and capabilities that cater to the evolving needs of digital marketing analysts.
Unlike its predecessor, GA4 uses an event-based data model that focuses on capturing detailed information about user actions and behaviors. This approach provides a more holistic view of the customer journey and enables businesses to make data-driven decisions with greater precision. There are huge advantages to using GA4, some of these advantages are:
Cross-platform tracking: This allows marketing analysts to gain a deeper understanding of the complete customer journey and identify the various touchpoints across all platforms that drive conversions.
Enhanced Data collection: GA4's event-based data model allows for more granular data collection compared to Universal Analytics. By capturing specific user interactions, such as page views, clicks, and form submissions, GA4 provides a richer dataset that can be analyzed for valuable insights. Additionally, GA4 offers automatic tracking for common events, reducing the need for manual configuration and ensuring that important data is not overlooked.
Privacy-centric: With increasing concerns about data privacy and regulatory compliance, GA4 places a strong emphasis on user privacy and consent. GA4 includes features such as data retention controls, user opt-out options, and IP anonymization, helping businesses comply with global privacy regulations like GDPR and CCPA.
Advanced analysis and reporting: GA4 goes beyond just counting user events, it includes built-in machine learning capabilities, which can automatically surface trends and anomalies, predict user behavior, and identify opportunities for optimization. . GA4's customizable reporting interface allows users to create tailored reports that highlight key metrics and performance indicators relevant to their specific goals.
Integration with other Google Marketing Platform Apps: GA4 seamlessly integrates with other Google products and services, such as Google Ads, Google Tag Manager, and BigQuery. This integration enables marketing analysts leverage their analytics data across various marketing and advertising platforms, creating a cohesive and efficient workflow.
Creating A GA4 Property
What you need:
- A Google account
- A Google Tag Manager Account (with publishing access)
- Your website URL and admin access to the CMS (ex: WordPress, Drupal, etc.)
Part A: Google Analytics property set up
- Navigate to analytics.google.com/analytics/web
- If you don't have an existing Google Analytics account, you'll land on the account creation page.
- Otherwise, on the GA4 home page, go to "Admin" and click on "Create", then select "Property".
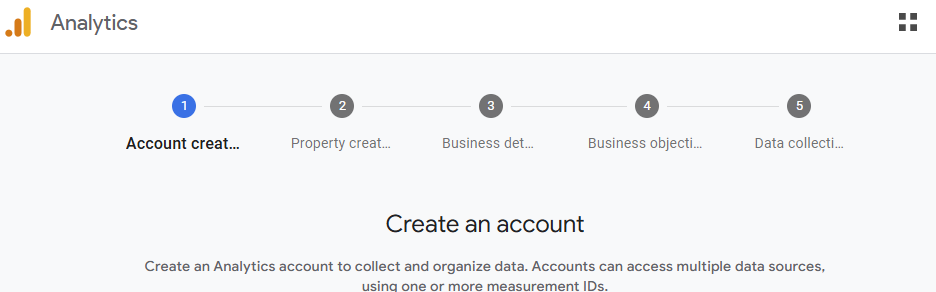
- Go through the GA4 property creation process flow 1-5:
- Account creation (1): Select a name for the account
- Property creation (2):
- Property name:
- Reporting country and time zone:
- Currency: Optional; mainly for ecommerce websites and setting key event (conversion) value.
- Business details (3):
- Industry category
- Business category
- Business objectives (4): Select the applicable business objectives for the website, then click "Create"
- Data collection (5): To set up how the website collects data; select the appropriate option for your use case (typically select "Web" for tracking events on a website)
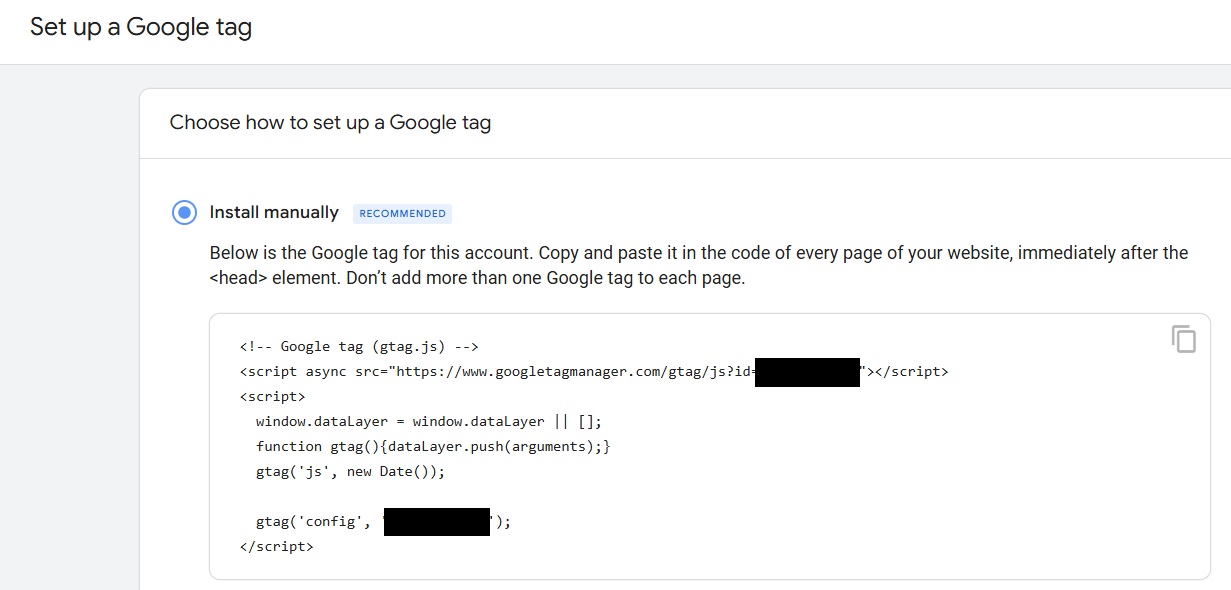
- Enter your website URL and a Stream Name: After selecting the data collection platform, time to set up the data stream. Input the website address under "Website URL" then give the data stream a name. If using Google Tag Manager for custom tracking, consider turning enhanced measurements off. Personally, I would turn off enhanced measurements here and set up custom tracking in GTM for the website actions that needs tracking by pushing custom events to the data layer. However, if leave enhanced measurements on if this does not apply in your use case. When done, click "Create & continue". After creating the stream, copy the Google tag code snippet displayed under "Install manually".

Part B: G-Tag set up in Google Tag Manager and CMS
- Navigate to tagmanager.google.com
- If you don't already have a GTM account and container set up for the website, click "Create Account".
- Account Setup: Input a name for the Account, and select the country.
- Container Setup: Input a name for the GTM container (typically the website name), and select the target platform; for client-side website setup, select "Web".
- Read the Google Tag Manager Terms of service agreement
- Immediately after completing the account and container set up, an "Install Google Tag Manager" pop-up should come up on the screen. If not, click on the "GTM-XXXXXXXX" blue text characters on the GTM container home page.
- Copy the GTM scripts (1) and (2) as displayed in the pop-up.
- If you already have a GTM account and container set up, just click on the "GTM-XXXXXXXX" blue text characters on the GTM container home page, then Copy the GTM scripts (1) and (2) as displayed in the pop-up.
- If you don't already have a GTM account and container set up for the website, click "Create Account".
- Add GTM script in WordPress (my example CMS): I'll be using WordPress for this example
- On the left-hand pane in the WordPress dashboard, click "Plugin" and select "Add New Plugin"
- Search for a plugin that would allow you to insert the Google Tag Manager script to the header of your website's HTML. I personally would use WPCode, but do your own research here and go with the option that works best for your use case.
- Alternatively, you can manually insert the GTM script into
header.phpandbodysections of your theme files. - After adding the GTM script in your CMS (remember to publish the changes), navigate back to the "Install Google Tag Manager" pop-up in GTM.
- Use the "Test your website" option in (3) to check that the GTM script is added correctly.
- A green check mark indicates that you're ready to move on to the next step
- Install the G-Tag script from Google Analytics: Now that the GTM tag is now live on the website, it's time to install the GA4 tag into that GTM container.
- Select "New Tag", and name the new tag something like "G-Tag"
- Click to edit "Tag Configuration", then select the "Google Analytics" tag type, and click "Google Tag".
- For the Tag ID, go to the GA4 "Web stream details" page (Part A - 3), and copy the measurement ID which has a "G-" prefix then around 10 alphanumeric characters.
- The "Initialization - All pages" trigger should be pre-selected, but if not already, select it as the trigger for this tag. Then click "Save".
- Use the GTM preview to test that the "G-Tag" tag fires on the page
Part C: Test implementation in GA4 and set up data filters as needed
- In the GA4 "Web stream details" page (GA4 Home > Admin > Data collection & modification > Data streams > [stream name]), scroll down to "View tag instructions". Note the message indicated here will either be "Data flowing" (meaning GA4 is successfully receiving data), or "No data received" (meaning it requires further troubleshooting).
- If it indicates "No data received" or some similar text, click "View tag instructions" then select the "Install manually" tab,
- Input your full website URL into the "Test your website" text bar and click test
- If the test result shows a green check mark, then the G-Tag was installed correctly and you should begin seeing data flow into GA4 within 48 hrs (usually from after a few hours)
- If it indicates "Data flowing", then the G-Tag was installed correctly and you should be able to see some data in the real time reports.
- Real-time reports should show live activity within minutes, while standard exploration reports may take up to 48 hours.
- If it indicates "No data received" or some similar text, click "View tag instructions" then select the "Install manually" tab,
- Finally, check the data retention setting and be sure that the selected length of time you want to retain event and user data meets the business' reporting needs.
Email: s.o@sesandatalab.com
© 2024 Sesan Data Lab